
Greetings from the Microsoft Technology Center in Silicon Valley (MTCSV) in Mountain View, CA. I have been putting in a lot of time lately on the new System Center 2012 R2 Virtual Machine Manager infrastructure that is hosting all the operational compute and storage for the MTC. There are numerous blade chassis and rack mount servers from various vendors as well as multiple storage devices including 2 EMC VMAX arrays and a new 2nd generation VNX 5400. We have been using the SMI-S provider from EMC to provision storage to Windows hosts for a while now. There is a lot of material available on the EMC SMI-S provider and VMM so I am not going to write about that today. I want to focus on something new in the 2012 R2 release of VMM – integration with SMI-S for fibre channel fabrics.
There are many advantages to provisioning storage to Windows host and virtual machines over fibre channel networks or fabrics. Most enterprise customers have expressed interest in continuing to utilize their existing investments in fibre channel and would like to see better tools and integration for management. Microsoft has been supporting integration with many types of hardware devices through VMM and other System Center tools to enable centralized data center management. The Storage Management Initiative Standard (SMI-S) has been a tremendously useful architecture for bringing together devices from different vendors into a unified management framework. This article is focused on SMI-S providers for fibre channel fabrics.
If you right click on the Fibre Channel Fabrics item under Storage in Fabric view and select the Add Storage devices option you will bring up a wizard.

The first screen of the wizard shows the new option for 2012 R2 highlighted below.

We are using the Brocade SMI-S provider for Fibre Channel fabrics. The provider is shipped with the Brocade Network Advisor fabric management tools. We are using BNA version 12.0.3 in the MTCSV environment. The wizard will ask you for the FQDN or IP of the SMI-S provider that you wish to connect too. It will also ask for credentials. We are doing a non-SSL implementation and we left the provider listen on the default port of 5988. That is all there is to the discovery wizard. The VMM server will bring back the current configuration data from the fibre channel fabric(s) that the SMI-S provider knows about. In our case we have fully redundant A/B networks with 4 switches per fabric. Here is what the VMM UI shows after discovery is complete.

Once we have discovered the fabrics we can go a the properties of a server that has FC adapters connected to one or more of our managed switches. The first highlight below show that VMM now knows what fabric each adapter is connected. This allows VMM to intelligently select what storage devices and ports can be accessed by this server adapter when creating new zones. That’s right; with VMM 2012 R2 and the appropriate SMI-S providers for your storage and FC fabric you can do zoning right from within the VMM environment. This is huge.

The second highlight above show the HyperV virtual SAN that we created in VMM for each of the adapters. The virtual SAN feature set was released with Windows Server 2012 HyperV. It is the technology that allows direct access to fibre channel LUNs from a virtual machine that can replace pass through disks in most cases. That is also a really big topic so I’m going to write about that more in the context of VMM and fibre channel fabrics in a later article. For today I want to focus on the use of VMM for provisioning fibre channel storage to HyperV parent clusters. Now let’s take a look at the zoning operations in VMM.
The next figure show the Storage properties for a server that is part of a 5 node cluster. The properties show what storage arrays are available through fibre channel zoning. You can also see the zones (active and inactive) that map this server to storage arrays.

Lastly, I want to show you how to zone this server to another storage array. The place to start is in the storage properties window shown above. Click the Add | Add storage array icons to get to this screen.

As you can see from the window title this is the correct place to create a new zone. This is the same regardless of whether this is the first or third array (as in this case) you are zoning to the selected server. I highlighted the Show aliases check box that I selected while making the above selections. In order for the friendly name zoning aliases to be available they must be created in the BNA zoning UI after the server has been connected to one of the switches in this fabric. You can also see the zone name that I entered that will be important when I move to the final steps to complete this example.
Now that the zone has been created let’s take a look at the Fibre channel fabrics details.

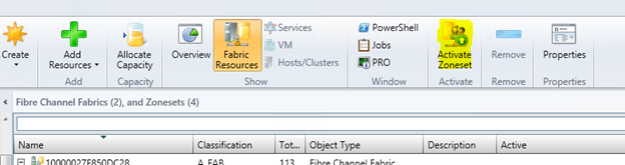
I’ve highlighted the total zones defined in the Inactive and Active sets for the A fabric. This shows that new zones have been created but have not yet been moved into the Active zone set. If you open the properties of the Inactive zone set and sort the Zone Name column you can see the zone that we created 2 steps above.

In order to activate this zone use the Activate Zoneset button on the ribbon. One important detail is that you can only activate all the staged zones or none of them. There are two zones that are in the Inactive zoneset that will be activated if you push the button. Be sure to coordinate the staging and activation of zones in the event the tool is being shared with multiple teams or users.
The world of private cloud management is changing rapidly. VMM and the other System Center products have made huge advancements in the last two releases. The investments that Microsoft and storage product vendors have been making in SMI-S integration tools are starting to bring real value to private cloud management. Take a look, I think you’ll be surprised.
